


Welcome to the Apilo Help Center.
Emails to clients and message templates
Contents
Advantages and capabilities of templates:
- informing the customer about order creation, order processing, order shipment, and much more;
- sending emails from your own mailbox (SMTP);
- individual mailboxes for each sales channel;
- enabling and disabling specific notifications;
- sending generated invoices in Apilo via email to the customer;
- sending a link to track the shipment;
- support for 3 languages: Polish, German, English,
- the option to send a confirmation request with a link to confirm the order in the customer center.Information about manual order.
Adding your own email box
By default, notifications are sent from the emailnotifications@apilo.comTo connect your own email, go to Administration > Mailboxes >Add a new email address.
You will get the server name and port number from your mailbox operator. Usually, the relevant tab “How to configure a mail client?” can be found in the help panel of the webmail service. If you see an error after saving the form, try the default ports: 587, 25 or 465.
Gmail box
Gmail, unlike other webmail services such as WP/Onet/Interia, has additional security measures.
1. Go to https://myaccount.google.com/security
2. Click on the tabTwo-Step Verification >perform the configuration and enable two-step verification.
3. Click on the tabApp passwords (the tab will not appear without enabling two-step verification).
4. In Apilo go to Administration > Mail Settings:
- login: full email address in Gmail (e.g. apilo@gmail.com)
- server: smtp.gmail.com
- port: usually 587 or 25.SSL is supported on port 465.
- password: generated in the previous step
6. Save changes – done!
Yahoo Mail
1. Create a temporary password for the application on the page https://help.yahoo.com/kb/SLN15241.html
2. In configurationin Apilo, enter:
- Password: created in step 1
- Server: smtp.mail.yahoo.com
- Port: 587 or 465
Interia.pl Mailbox
1. Log in to your mailbox via the website and select the option “Mail Settings” (gear icon in the lower right corner of the screen).
2. Go to the tab Main Settings -> Parameters.
3. The field “I use a mail application” set to Yes.
Automatic message configuration
I. Go to Administration > Automated Tasks.
II. Click the button Add in the upper right corner.
II. Fill out the form:
1. The first step is to choose what event in Apilo should occur for the message to be sent. The events to choose from include:
- order has been created / downloaded
- order status has changed
- payment status has changed
2. The next step is to specify/narrow down the event selected in Step 1. There are various conditions that must be met for the email to be sent, e.g., only a specific sales channel or only orders with the status paid.
3. If the event occurs (step 1), and the conditions are met (step 2), an action will be executed. For the action, select Send Email and choose one of the default templates or create your own in Administration > Message Templates.
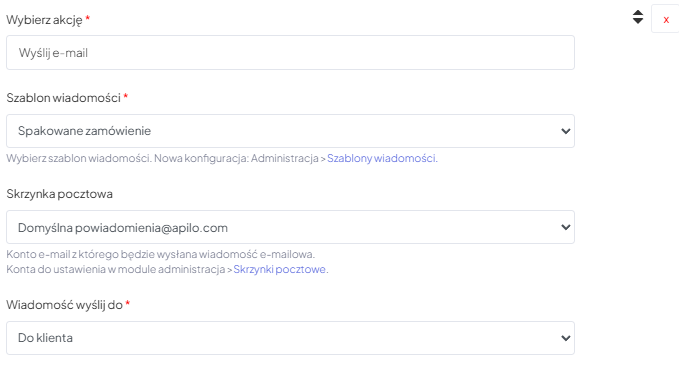
Configuration of new message templates for clients
Go to Administration > Message Templates. In this tab, you can:
- Duplicate the default template
- create a New Template
- edit default templates
Variables
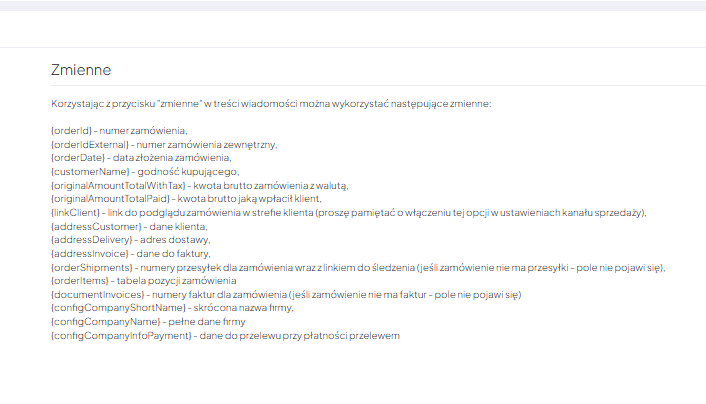
In the content of the email, you can use variables, which are fields that will be automatically filled in when the email is sent to the buyer. To do this, click the Edit button and in the email content setup form, click the Variables button 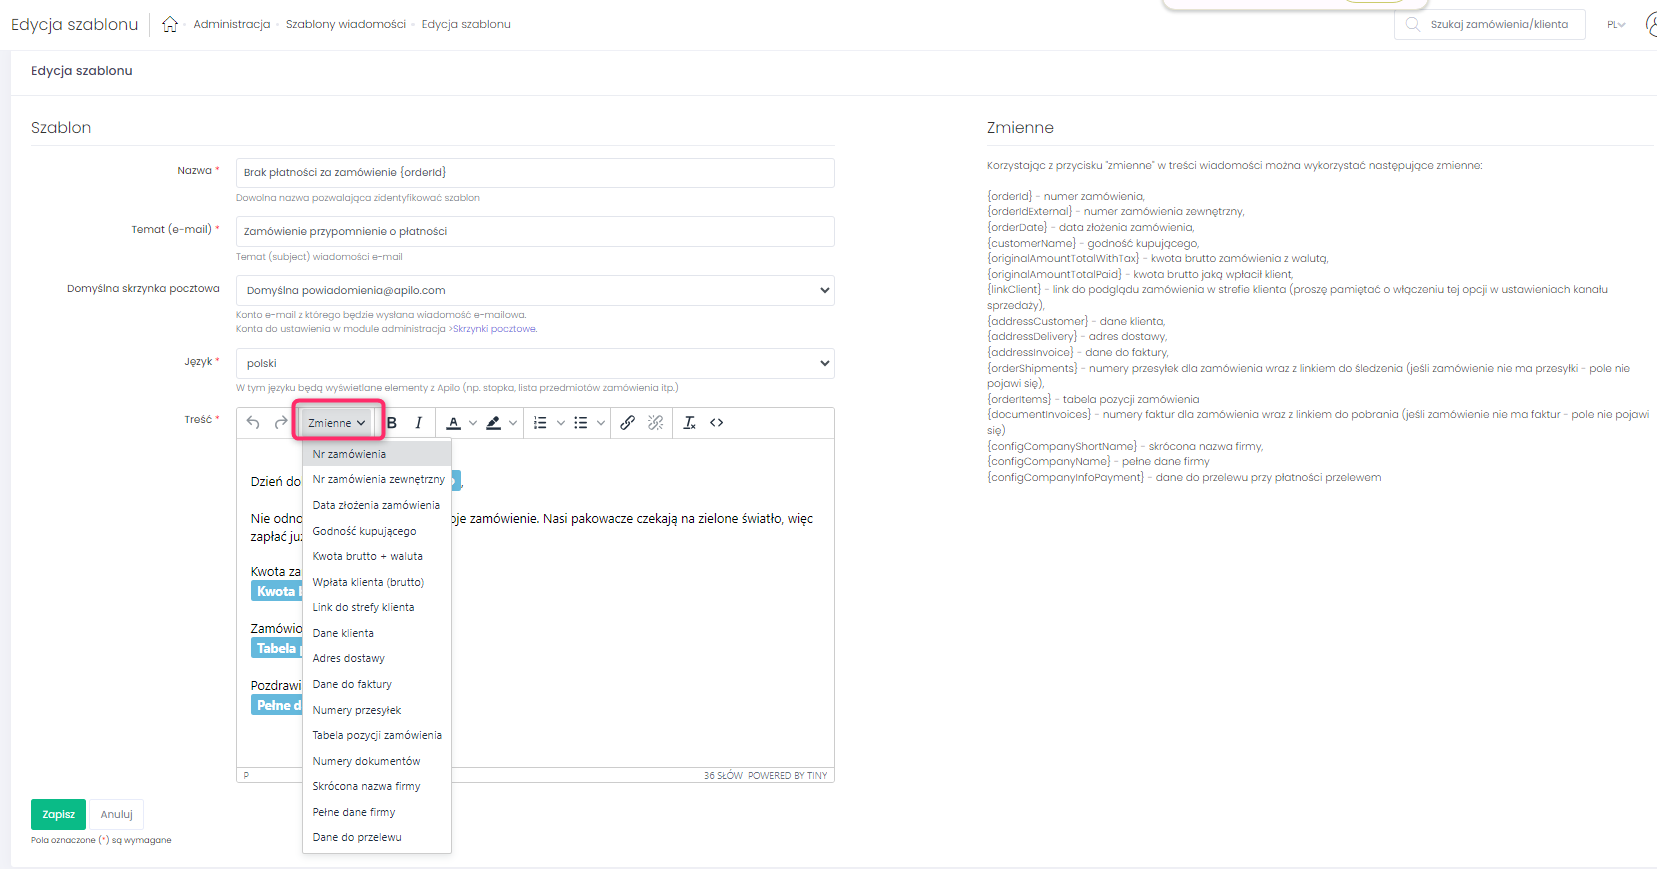
List of variables:
- {orderId} – order number from Apilo
- {orderIdExternal} – external order number (e.g., from Shoper, Allegro)
- {orderDate} – order submission date
- {customerName} – name of the buyer
- {originalAmountTotalWithTax} – gross amount of the order + currency
- {originalAmountTotalPaid} – client’s payment (gross)
- {linkClient} – link to the client area/view of order details in a special way. Information in the panel updates automatically. Check what a sample client area looks like – click!
- {addressCustomer} – client’s address
- {addressDelivery} – delivery address provided by the client
- {addressInvoice} – invoice details provided by the client
- {orderShipments} – shipment number along with a tracking link (displayed if the package has been shipped)
- {orderItems} – list of order items
- {documentInvoices} – invoice number with a link for download (displayed if an invoice for the order has been generated)
- {configCompanyShortName} – shortened company name entered during Apilo configuration
- {configCompanyName} – full company details provided in the Company Settings in Apilo
- {configCompanyInfoPayment} – payment details for the buyer provided in the Company Settings in Apilo.

Adding an attachment to the template
You can add an email attachment that will be sent along with the message.
Go to the Administration tab -> Message templates -> ‘New template’ or edit the existing template. Below the ‘content’ field, there are three attachment fields: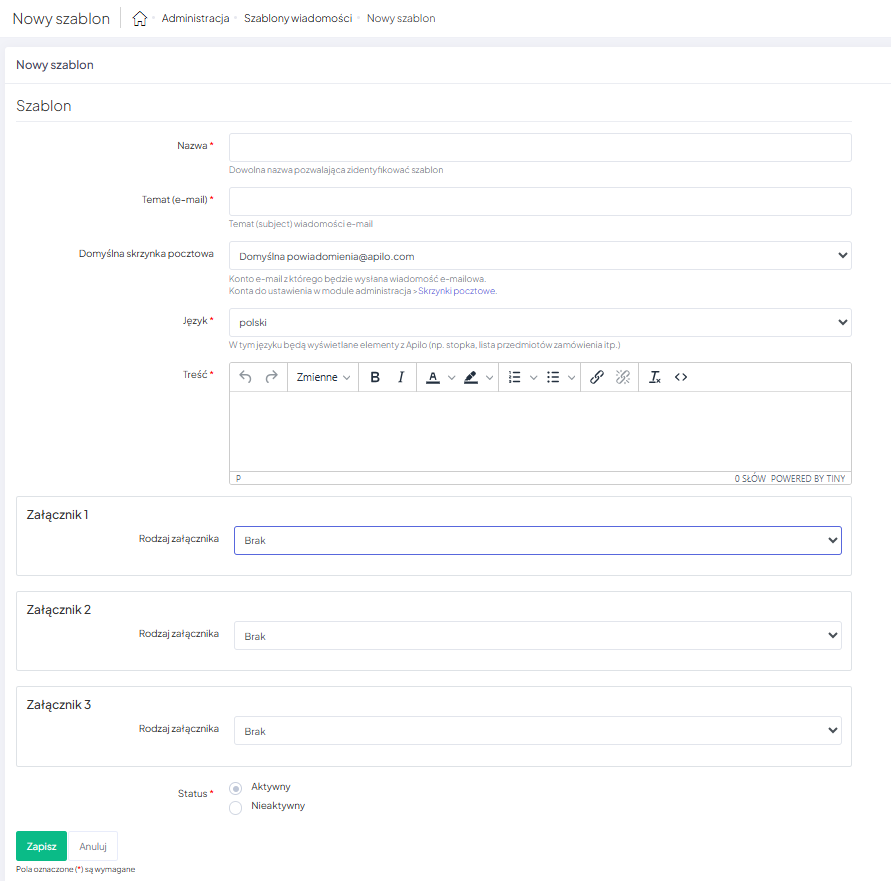
By clicking on the ‘attachment type’ field, select from the list the variable that should be sent as an attachment in your message: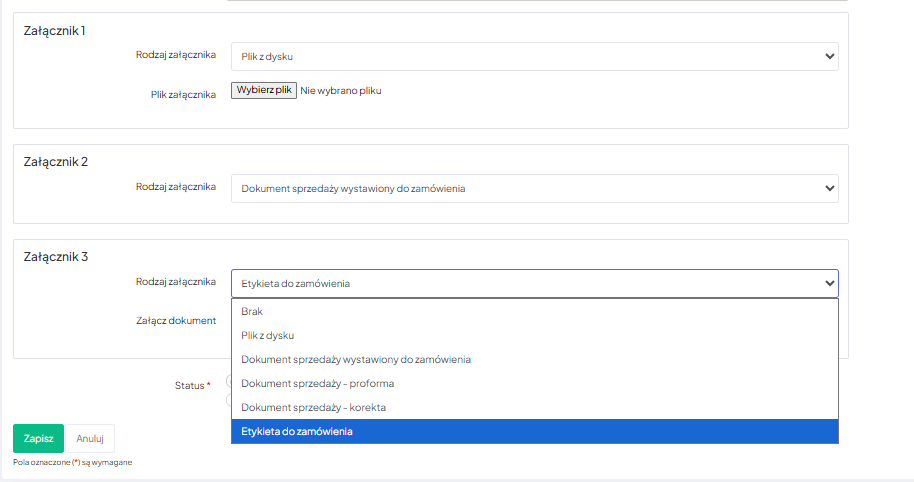
Sample template
You can set up a message template that will be sent to customers to provide them with invoice information. To do this, go to the Administration tab -> Message templates -> click the ‘add template’ button in the upper right corner. In the ‘name’ field, give a name for the created template,
- in the ‘subject’ field, provide the content that will be shown in the subject of the sent email message,
- in the default mailbox field, select the mailbox from which the message should be sent
- in the language field, choose the language in which elements from Apilo should be displayed
- in the content field, write the message that should be sent to the client. Remember to use the variables visible on the right side of the ‘content’ field.
Note: variable {documentInvoices} provides only the invoice number in the email – it is not an attachment.
- After completing the content, select the attachment as below:
attachment 1 -> select the type of attachment for the provided example, this will be a sales document issued for the order:

Important: You can add 3 different attachments to one template.
With the help of attachments, you can send a file in the following formats:
– Office: ‘.doc’, ‘.docx’, ‘.xls’, ‘.xlsx’, ‘.ppt’, ‘.pptx’,
– Archives / documents: ‘.zip’, ‘.pdf’, ‘.txt’,
– Images (without SVG): ‘.jpg’, ‘.jpeg’, ‘.png’, ‘.webp’, ‘.gif’,
This guide has been translated using AI-powered tools.
Still need help?
Talk to a support agent
